Measuring the Size of a Pixel
Experiment number : 2260
Goal of Experiment
The experiment should help students to form an idea of the size and shape of a pixel.
Theory
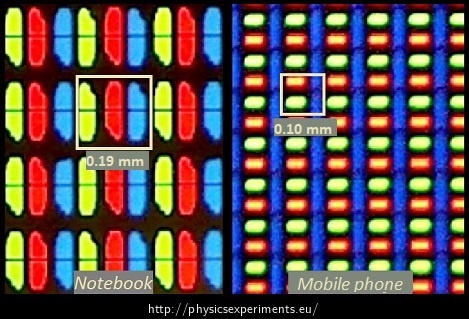
A colour image on a computer monitor, telephone display, or television screen is created by the simultaneous perception of miniature areas, each of which can with varying intensity radiate one of the basic colours of the RGB system (i.e., red, green, or blue). These areas do not overlap and are so small that we cannot see them from a normal distance. The resulting colour shade is created by the simultaneous perception of three colours radiated by the area.
These individual areas are called subpixels, three subpixels with different colours form one pixel. The size and appearance of pixels depends on the type of screen, but they usually fill a square grid.
Equipment
Computer, USB microscope.
Procedure
Connect the USB microscope and install the software according to the enclosed instructions.
Place the microscope on the monitor and focus it.
Add the magnification of the microscope (can be read directly from the body of the microscope) into the installed software and measure the size of one pixel (see figure below).
If we measure the dimensions of the monitor, i.e. height and width without the frame, we can calculate its native resolution.

Technical Notes
Learn how to operate the microscope programme in time so that you do not delay the course of the lesson.
It is advisable to put the microscope to a white space on the display so that all three subpixels are visible.
It is possible to use a colour-lit display of any electronic device, such as a mobile phone or tablet for the experiment.
Pedagogical Notes
Students should see different types of colour displays to realize that each pixel may look different, but it is always a grouping of three areas of red, green, and blue.


